This page explains how to create a custom subscription form in pure HTML. Newsletter automatically generates subscription forms by using shortcodes, but designers may want to totally restructure a subscription form to obtain a better user experience.
What's inside
- The generated HTML version
- Hand coding the form
- The Field Names
- Special Hidden Fields
- Validation
- Frequently asked questions and some best practices
The generated HTML version
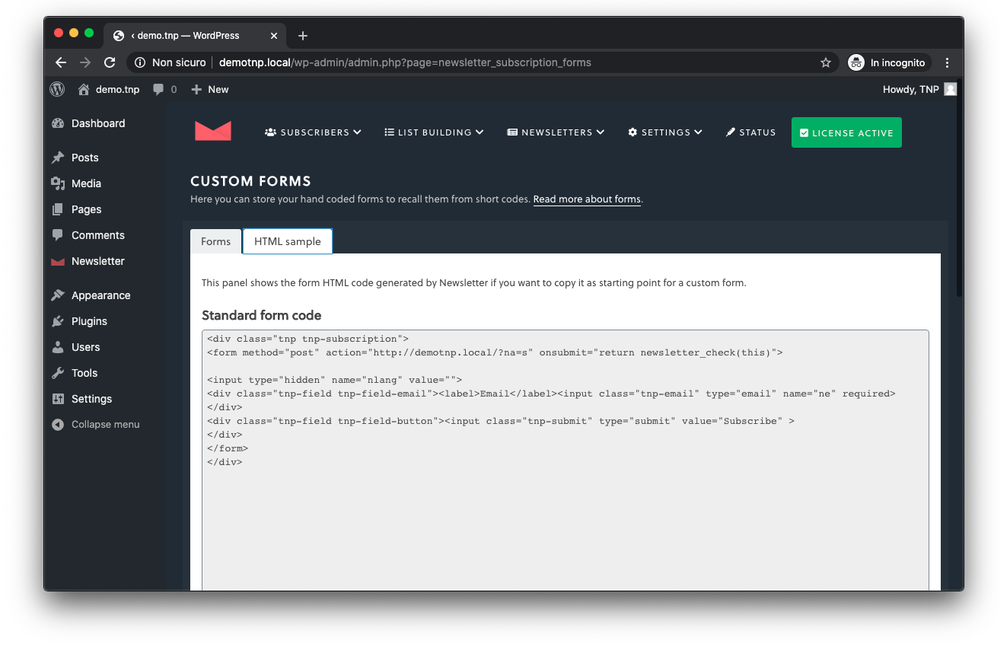
An HTML version of the generated form is available on the “Subscription forms” panel and that code reflects exactly the form configuration. You can start from that code and move further.
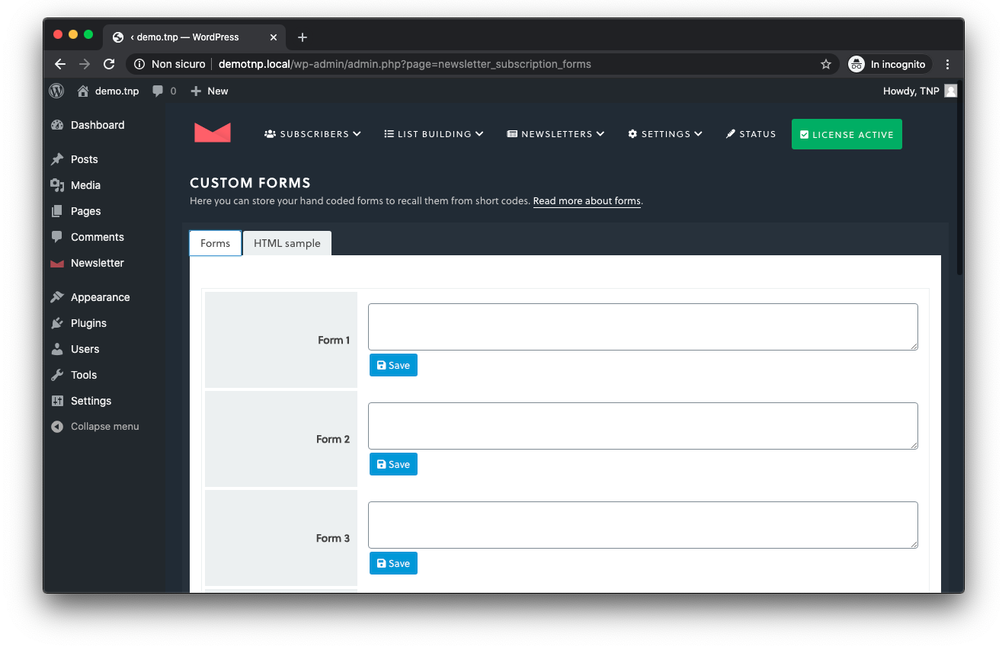
Custom forms can be pasted directly in a page or in the theme code or in a text widget, or they can be stored in the forms repository of Newsletter (see the “Subscription forms” panel) and recalled with shortcodes.
Hand coding the form
To do that you need HTML skills and knowledge of HTML forms.
A form is simply a piece of HTML and a bit of JavaScript to pre-validate field values. The code generated can be easily copied from the original, reworked, and reused elsewhere.
To help in this task, Newsletter (since version 3.0) has a special panel where to get and copy the pre-generated form, created following the setting of the form fields panel. The simple format we provide should be easy enough to elaborate.
Important note:
To recall a stored custom form you have to use the shortcode [newsletter_form] by adding the form number you need: [newsletter_form form="X"], where “X” is the form number. Read more about forms and shortcodes.
The Field Names
One of the most important issues when dealing with custom forms is the field names. They also are common mistakes on hand-coded forms, so pay extra care to this aspect. Newsletter 3.0 introduced some simplifications, removing the need for hidden fields, but the names of the fields have been kept for compatibility.
An example of the field is:
<input type="text" name="ne" value="" size="40">
The “name” attribute is what really matters. HTML 5 introduced some new types, like email, with the ability to auto validate and those new features will be included in Newsletter on future versions.
Here you have a list of field names. Only the email field, named “ne”, is required, since the simplest form you can use is the one with only an email address.
ne– the subscriber emailnn– the subscriber complete name or first namens– the subscriber last namenl[](combined with a value) – represent a preferencenpX– the subscriber profile number Xnx– the subscriber gender (valid values arem,f,n)ny– for the privacy acceptance checkbox (the alert is shown only if the privacy checkbox is active on the subscription form configuration panel)
The field(s) named nl[] (as is this is exactly the field name required by PHP) must be checkboxes with this format.
<input type="checkbox" name="nl[]" value="X">Preference name
The field value “X” must be a preference number and that preference must be set as active on the form fields panel (either as to be collected on the profile edit page or on the subscription form). There is a reason for that: a preference marked as “not active” can still be used by administrators to classify users and to send emails to the ones with that “private” preference active – but such a private preference should never be modifiable by subscribers.
You can even make that field hidden to set the list automatically for a subscriber who uses that particular form. In this case, list X must be set as public.
<input type="hidden" name="nl[]" value="X">
The profile fields, npX, are always stored as texts so a text type field is perfect. You can even use a select (dropdown list) HTML field as it is configurable on the form fields panel. Here are some examples of profile fields (for example, we suppose to collect the profile number 1 so we use the name np1):
- As a normal one line text:
<input type="text" name="np1" value="">
- As a textarea:
<textarea name="np1"></textarea>
- As select (dropdown list)
<select name="np1">
  <option value="red">I love red</option>
  <option value="red">I love red</option>
</select>
Important notes:
- If you let subscribers edit their profile fields on the profile edit page, remember that the profile edit page is always generated, so you should configure the fields to be generated in a compatible format as the one presented on the subscription form. Clearly, if you use the subscription form generated by Newsletter, there should no problems.
- A complete form needs the <form> tag with an action attribute. The action attribute has to point to:
https://www.domain.tld/?na=s
- Another attribute set on generating forms is the “onsubmit”, which recalls a JavaScript function to check the field values. Note that JavaScript checking can be bypassed easily, but the same kind of validation is made by Newsletter before it stores the data and, if errors are detected, it shows a message and blocks the operation. Therefore, one best practice is always to start from the code provided inside the subscription panel: configure the form fields and then start to code your own subscription form by using the code provided.
Special Hidden Fields
There are some special fields that do not show up inside the form (they are added as hidden fields) and are used to change the subscription behavior or pass over special data.
A special hidden field is added to the form as:
<input type="hidden" name="[the field name]" value="[the field value]">
An example of the use of the opt-in special field:
<input type="hidden" name="optin" value="single">
welcome_page_id– the ID of a WordPress page to be used as a welcome page instead of the standard message or page set on the Subscription configuration pagencu– this field specifies an alternative confirmation page (or welcome page when in single opt-in mode) URL which is used in place of the standard Newsletter pagesnr– it is a free short text that represents the source of the subscription. For example, the Newsletter widget sets it to “widget”. If you insert the form in a specific landing page you can set it to “landing-product-X”, for example.optin– can be set to “single” or “double” and it changes the optin mode. Note: you need to enable the opt-in override on the subscription configuration pane.-
Validation
If you are coding a custom form, you should care about user input validation. You can use the new “required” HTML 5 attribute and the input field types (text, email, number…) you probably need to add some JavaScript to be executed on form submit as well.
Newsletter injects some JavaScript with the function newsletter_check(form) which loops between the form fields and checks its validity: you can use it as it is or you can start from this code to craft your own validation code.
Frequently asked questions and some best practices
Where can I use a form?
Nearly everywhere, even on external sites! The generated code is complete of all the necessary information, JavaScript included (even with prevention for double inclusion of the same code).
Is there a best practice?
Generally, to keep the process smooth, it may be worth asking for less information on the subscription form. Ask for email, maybe for the name, maybe let the user choose some preferences, but do not make your subscription module as a tax refund request form.
After the user is subscribed and confirmed, you can show the profile editing form and ask him to give you some more data.
Can I add subscribers inside a list automatically on subscription?
Of course. If you want to insert every new subscriber inside a list, you can set that on the subscription panel. The Newsletter plugin will take care to add those preferences to the new subscriber. If you even expose those preferences and the users do not select them, they are added anyway.
You can refer to the lists documentation page for more information.
A second case is when you want a subscriber using a specific form to be added to one or more specific lists (without showing them), in order to distinguish people coming from that form from the other subscribers. In this situation you have to add a special hidden field to the HTML form:
<input type="hidden" name="nl[]" value="X">
where “x” is the number of the list where you want to add the new subscriber. If you need to add more than one list, just add more of those hidden fields, changing the “x” value.
Important: note: those “forced” lists must be configured as public lists, otherwise they will be ignored.
Can I change the opt-in method in a custom form?
You can override the global opt-in method selected on the subscription configuration page by using a special hidden form field. That works only if you enable the opt-in override on subscription main settings.
For example, to force the opt-in method to be “single” you can add the following line:
<input type="hidden" name="optin" value="single">