What's inside
- Create an Amazon AWS account
- Create the IAM user
- Get the API keys
- Verify your sending address
- How to run a test
- How to handle bounces and complaints
- Turbo mode
- Advanced topics
- Generating the Amazon API keys (DEPRECATED)
Amazon SES is a powerful and cheap email delivery service that can be used to send a massive number of emails from the Amazon cloud.
For high-volume mailing (more than 10,000) it is highly recommended.
Amazon provides a second service, Amazon SNS, to receive notifications about failed deliveries.
Amazon SDK requires at least PHP version 5.6 with curl, Zlib, and SSL but PHP 7+ is strongly recommended.
If you get errors but apparently the keys and the region are ok and you gave the correct permission to the IAM user (see below) and the SES account is out of the sandbox mode, try to rigenerate your keys: the Amazon SDK seems to have problem with some keys containing specific characters.
Create an Amazon AWS account
Amazon AWS is not the Amazon marketplace, so you need to create a specific account with them.
Go to create an Amazon AWS account.
New Amazon SES accounts are put in sandbox mode to prevent fraud. After the verification of your sending email address (see below) remember to unlock your account following the guide on this page.
Create the IAM user
IAM users are “virtual” Amazon AWS users limited to acting with your account services and with specific access privileges. This is the way Amazon recommends creating the API credentials.
Access your AWS console and enter the Identity and Access Management (IAM) service.
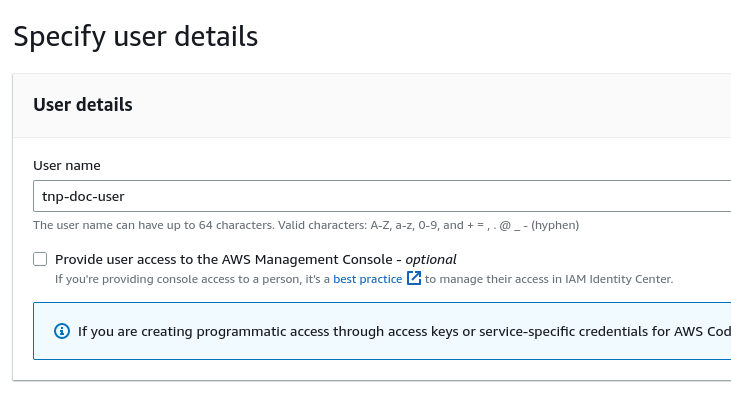
Choose Users from the sidebar and click the Add users button on the right.
Choose a name for the new user:
In the Set permissions page, choose Attach policies directly and select AmazonSESFullAccess and AmazonSNSFullAccess policies, as shown:
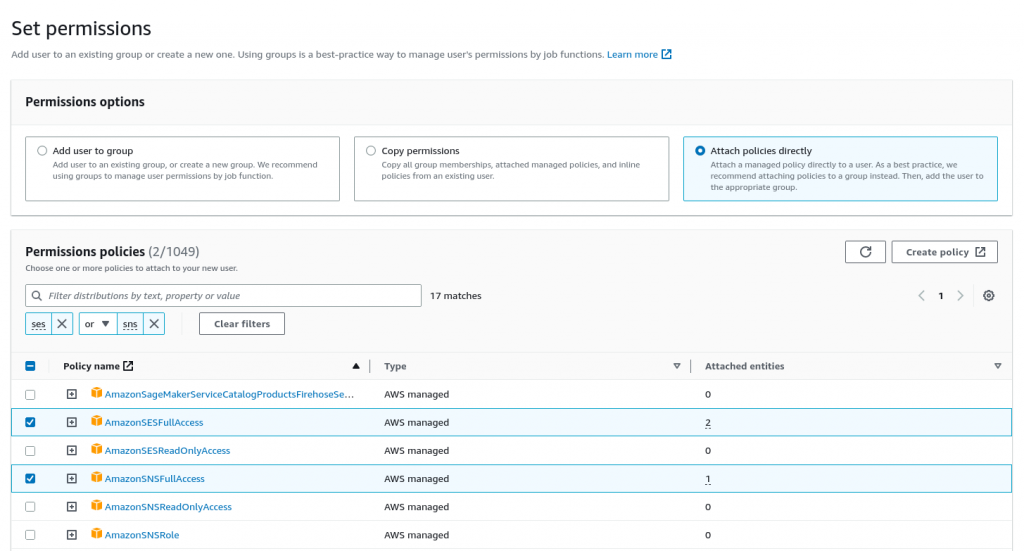
Then choose Next and confirm the user creation on the following screen.
Get the API keys
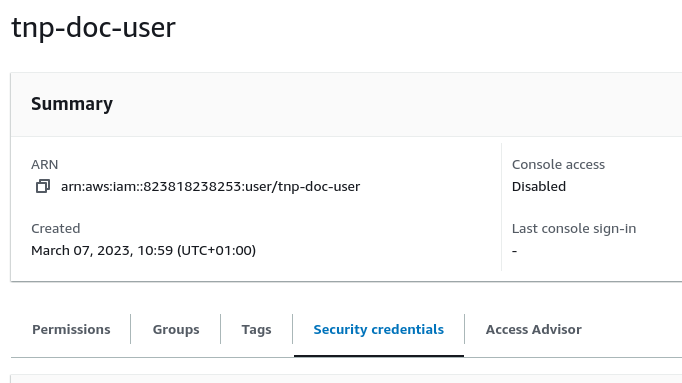
Click on the newly created user and choose the Security credentials tab.
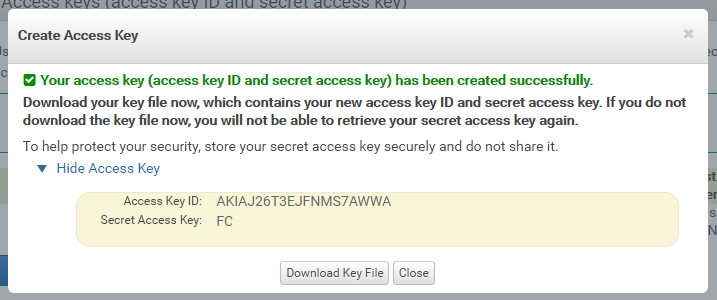
Choose Create access key in the Access keys section.

Choose the Application running outside AWS option and click Next.
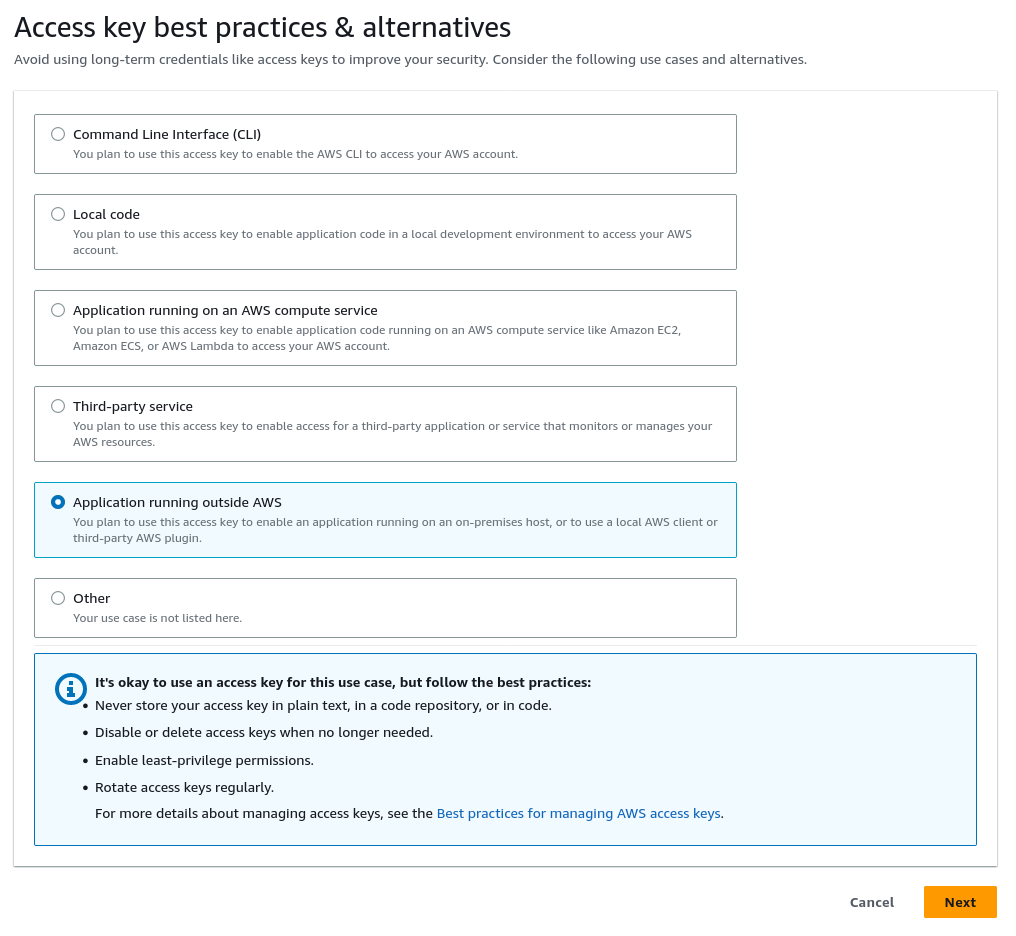
Skip the tags (or fill them in if you prefer) and proceed with the key generation.
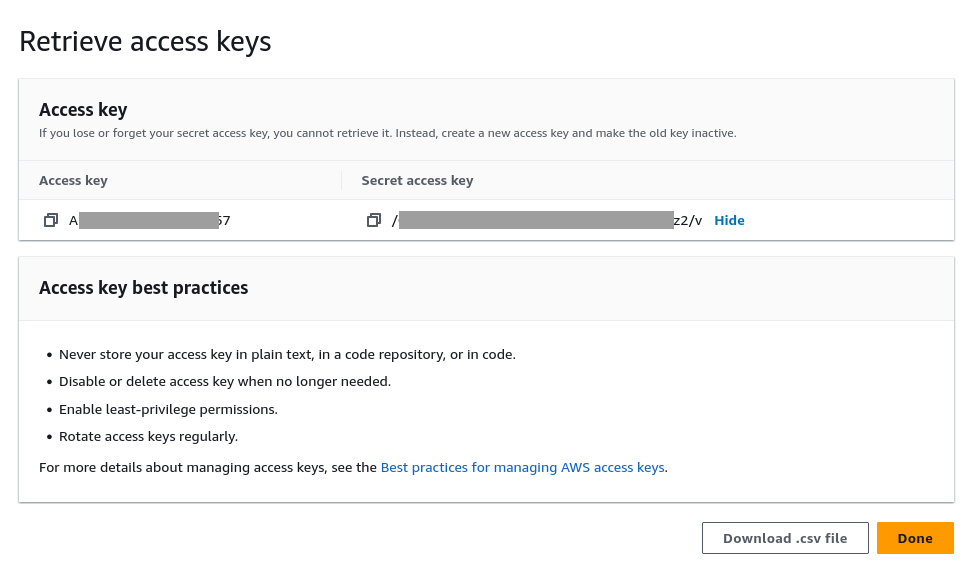
Now the screen is showing user credentials: you can copy or download them. This is the only opportunity to get the secret access key, so be sure to retrieve it.
If you lose the access keys, you can generate a new pair.
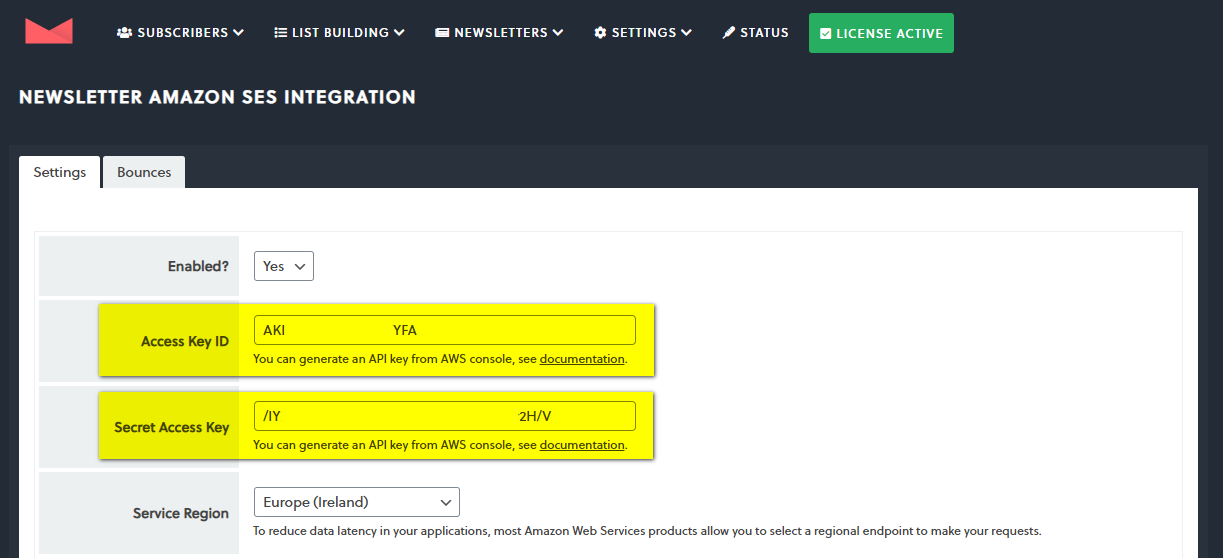
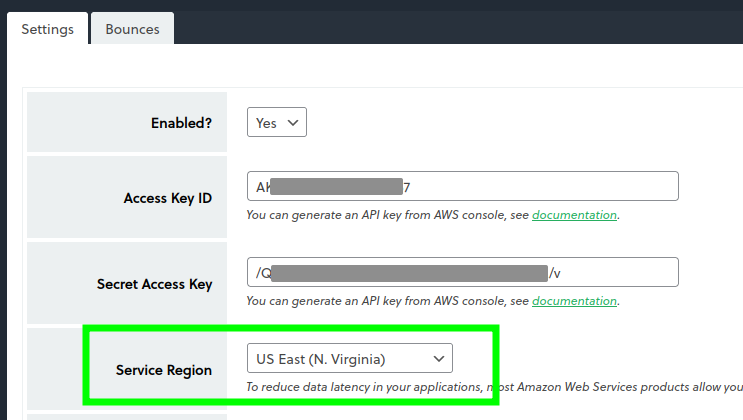
The pair of keys (Access key and Secret access key) you got can be set on the Amazon SES addon for Newsletter configuration panel. Be sure, on that panel, to select the correct Amazon AWS region as well.
Now you can proceed with the addon configuration verifying the sender address (if not already added directly in the Amazon SES console). If you prefer you can verify the whole domain by adding it to the Amazon SES console (but it requires modification to your DNS).
Verify your sending address
Before sending your emails with Amazon, the SES service requires validation of the email address you want to use as the sender address. Your sender address is configured in the main Newsletter configuration.
The extension does everything automatically, just press the “check” button: a check is made with SES service and eventually a verification button is displayed.
If needed, start the verification: an email is delivered by Amazon at the sender address (so a real mailbox must be associated with it) with a link to confirm. Just follow the instructions message.
To check if the address has been correctly verified you can use the “check status” button or enter the SES console in the right Amazon region to see if your sender address is listed as verified.
How to run a test
If everything is configured correctly, you can run a test. A message is sent to all your test subscribers using the Amazon SES service (even if the addon is not enabled).
When the test is positive you can enable the extension so Newsletter will use it to send every email.
How to handle bounces and complaints
Amazon handles bounce notifications in a rather complex way. This add-on simplifies the configuration reducing it to a button: “Activate the bounce tracking”.
Once tracking is active, Amazon starts to notify the bounced and complained addresses directly to this addon which in turn marks the notified address as bounced so it won’t be contacted anymore. You can the bounced addresses in your database checking their status.
The notification is asynchronous. It could take a few seconds as well as days. In fact, a formally correct address is invalid when the delivery of a message to that address fails. Amazon can try to deliver the message for a few hours before determining the address is not valid. Or it needs to receive a DSN from the remote system to understand there is not an available mailbox or the mailbox is blocked (typically for exceeded quota).
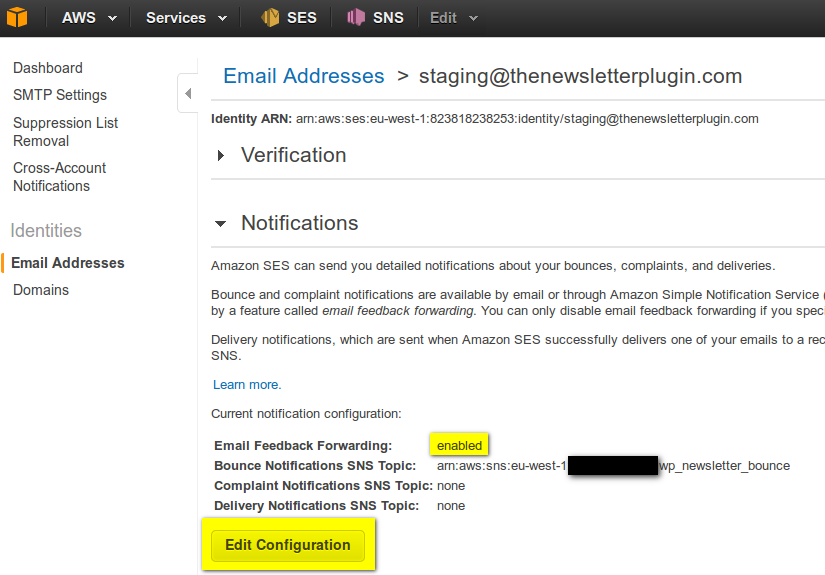
Amazon usually sends back also a DSN (Delivery Status Notification) email message to the sender’s address. This could be quite annoying, so you can disable this Amazon feature directly in the Amazon SES console. See the screenshot below.
Hard and soft bounces, complaints
Amazon distinguishes between hard bounces (non-recoverable delivery errors) and soft bounces (possibly recoverable errors, like a full mailbox). If you prefer to mark as bounced even the addresses with recoverable errors, you can activate the processing of soft bounces.
Complaints are always processed and those subscribed set to “complained” status.
Testing bounce processing
To test the bounce processing, you can send a test to bounce@simulator.amazonses.com from the plugin and check your logs, choosing System > Logs from the dropdown menu. From the list, you have to choose the last one starting with amazon-bounce, and see if the bounce notification has reached your system.
Turbo mode
In turbo mode, the official Amazon SDK (Software Development Kit) sends simultaneously more than one email. Since the PHP support for parallel execution is not very strong and sometimes limited by hosters, it could not work. Test it and use it with care.
Usually, on VPS or bare metal servers, it works without problems while on shared hosts there could be problems.
Advanced topics
API key and secret on wp-config.php
If you need to specify the API key and secret values in a way the blog administrator cannot access, see and change them, you can use two constants in the blog wp-config.php file. They are:
- NEWSLETTER_AMAZON_KEY
- NEWSLETTER_AMAZON_SECRET
add them to the wp-config.php file where other constants are added (not at the end of the file!), for example just after the DB_* definitions. The syntax is:
define('NEWSLETTER_AMAZON_KEY', '...');
define('NEWSLETTER_AMAZON_SECRET', '...');
both must be present and defined. Please DO NOT copy and paste the code above since the single quotes could not be the regular ones: just type the code directly in your wp-config.php file.
Generating the Amazon API keys (DEPRECATED)
The API keys are a pair of codes used to access the Amazon AWS services. You need to get them and set them on Amazon SES addon for Newsletter. Here is how to generate them.
Note: this method is deprecated by Amazon AWS but still works. For security reasons, you should create the API keys using an IAM user as explained below. It seems a long procedure but is rather simple.
First, enter the Amazon AWS console page located at
https://console.aws.amazon.com/iam/home#/security_credentials$access_key
It is not easy to find this link in the Amazon AWS console since it is considered a deprecated procedure.
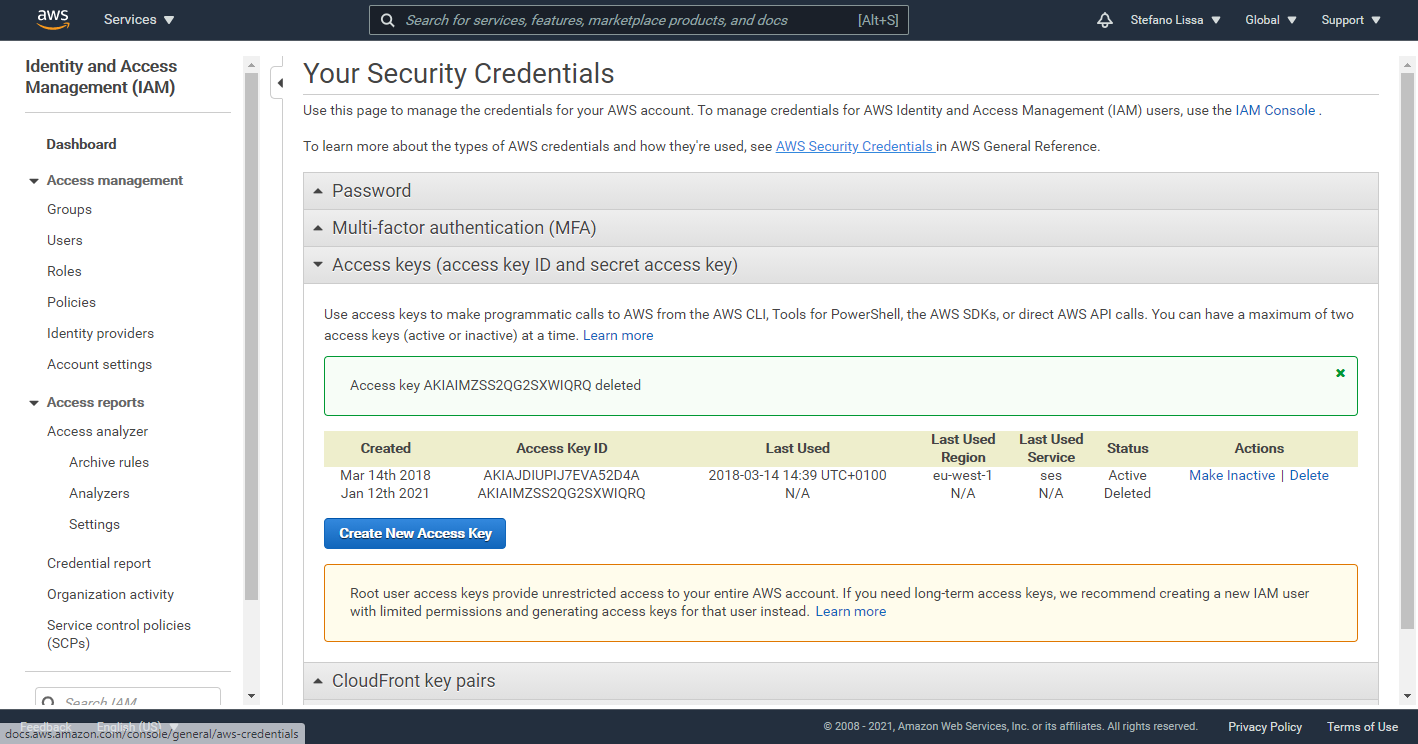
Press the button “Create New Access Key” and the keys are immediately created and shown with a popup like the one below. You need to copy those keys suddenly, they won’t be shown again.
Only 2 global access key pairs can be generated, if the button is shadowed, you need to use an already present key or delete one (of course is it is used by someone, the access will be revoked).
Now copy the two code in you Amazon SES addon for Newsletter configuration panel and then you can proceed with the setup. In that panel be sure to select the correct Amazon AWS region, as well.