Newsletter offers many tools to manage your subscribers: from search and edit, to import and export, to massive maintenance actions like deletion, list moving, and so on.
What's inside
- The subscriber's status explained
- The subscriber's log
- Test subscribers
- How to resend an activation email
- Import and export
- Inactive subscribers
- FAQs
The subscriber’s status explained
Every subscriber has a “status” to track its conditions (confirmed, not confirmed, invalid, and so on).
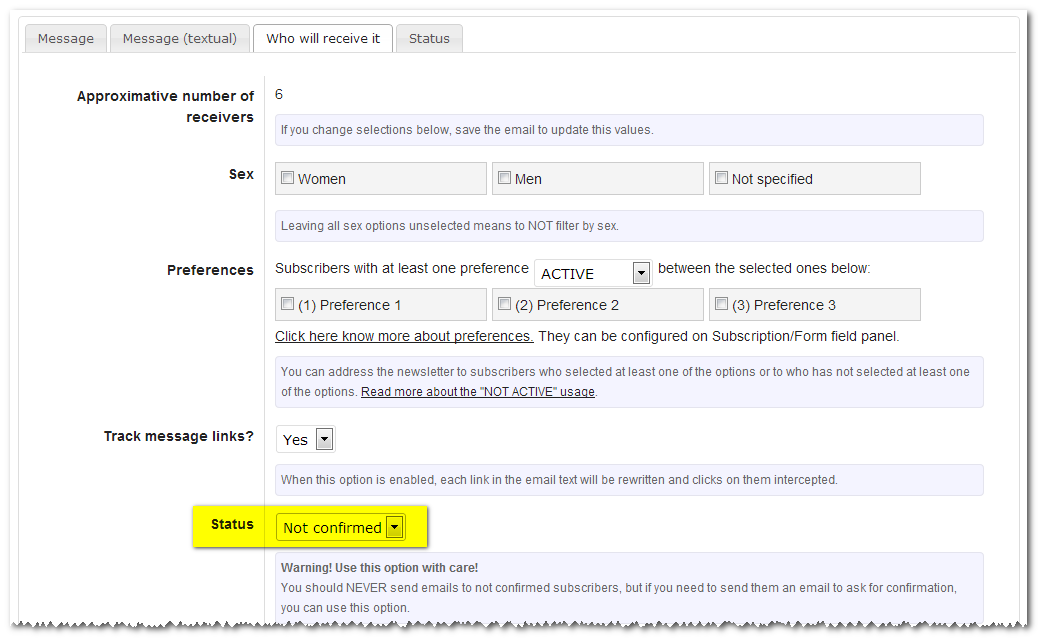
Confirmed. Those are the subscribers that will receive your newsletters. Every time a newsletter is sent only confirmed subscribers will be included, any other subscriber with a different status is automatically excluded and this is a core behavior of the plugin.
Unconfirmed or Not Confirmed. Those are subscribers who registered using a subscription form (or via other sources) but have not confirmed their email address by clicking the activation link on the activation email. That procedure is called “double opt-in” and can be enabled on the Subscription/Settings page. If the registration “single opt-in” mode is used, new subscribers are automatically registered as “Confirmed”.
The opt-in mode can be specified and different from the general one by addons like form builder integrations, WooCommerce integration and others.
Complained. This status is set when the plugin receives a complaint notification. Those notifications are managed by addons that integrate delivery services (like Amazon SES, SendGrid, SparkPost, …) or by the Bounce addon (with limits).
Bounced. This status is set when the plugin receives a delivery error notification. Delivery errors are sent from a few seconds to days after a message is sent and reported, usually, by one of the services involved in the delivery process. Those notifications are managed by addons that integrate delivery services (like Amazon SES, SendGrid, SparkPost, …) or by the Bounce addon (with limits).
Unsubscribed. This status is set when the subscriber clicks on the unsubscribe link included in each newsletter using the “footer block”.
The subscriber’s log
When possible, when the subscriber data is changed (for example the status, the lists it is part of, and so on) a small set of data is registered and available on the subscriber log page. It can be accessed by entering the dit page for a specific subscriber and selecting the “logs” sub-page.
Test subscribers
The best way to make a reliable test is to send a newsletter to real subscribers. This way the email is composed using real user’s data, like the name, email, identification code, sex, preferences, and so on.
The Newsletter plugin provides a setting that enables a regular subscriber to become a “test subscriber”. Opening a subscriber editing panel, there is a selection to set him as “test”.
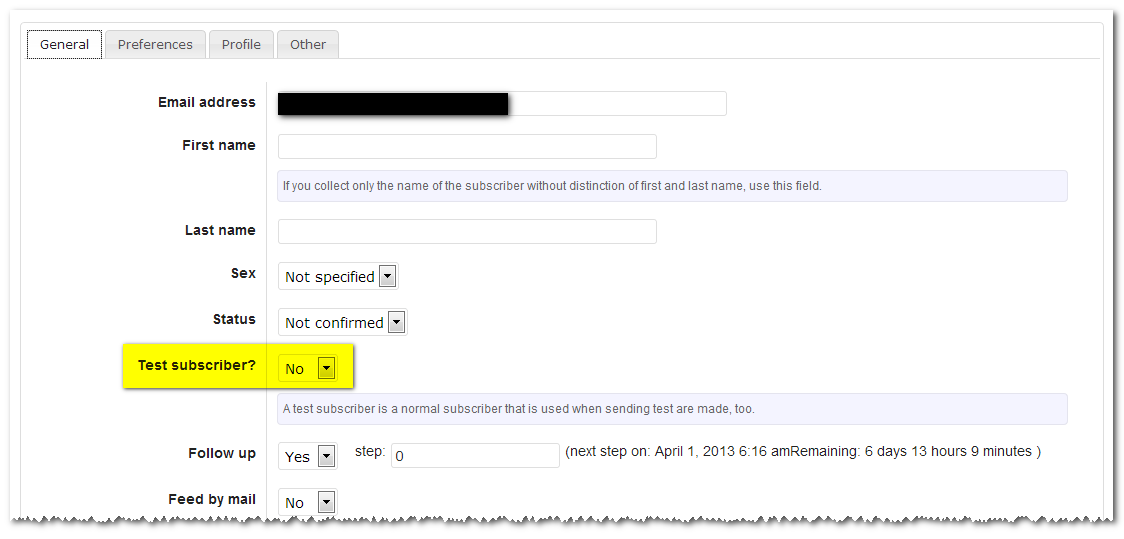
A test subscriber remains a regular subscriber, so when you send a real newsletter he’ll receive it. But when you send a test only subscribers with test settings to “yes” are used.
A note: sometimes the extraction of test subscribers ignores preferences or other targeting settings, it depends on the context. So if you set a newsletter to be addressed only to women, probably even if a test subscriber is a man he will be used as a recipient.
If you send a test newsletter enter an email address, if that email address exists as a subscriber, the data of that subscriber is used when sending the email (name, …).
How to resend an activation email
If you are in a particular situation with an important number of subscribers not confirmed (for any reason), you may want to send all a (new) confirmation message.
To complete this task, you should create a regular newsletter set to be addressed to the not-confirmed subscribers. In this email, it’s important to add the {subscription_confirm_url} tag as it is used in the normal confirmation message (configurable on the Subscription panel).
This method grants a secure delivery of this confirmation email even to a large number of subscribers.
Import and export
Import subscribers from external sources
To import subscribers it is recommended to install the free Import/Export add-on which provides ways to import from CSV files, copy-and-paste data, and massive bounced addresses import.
The import can be conducted in different modes: data merge, data replace, and so on.
Export subscribers
The export produces a CSV (UTF-8 encoded) file containing all the subscribers’ data. Usually, that file can be opened with Excel, Calc, and Google Sheets.
The status columns may show different values:
- C – Confirmed: the subscriber has confirmed the subscription (with the single opt-in the subscription is confirmed without any other subscriber action than submitting its email)
- S – To be confirmed: the subscriber has been requested to activate the subscription via an activation email
- B – Bounced: the email address has been reported to be unreachable
- U – Unsubscribed: the subscriber has opted out
- P – Complained
Please refer to the status description at the top of this page.
Importing bounced email addresses and marking the subscribers as “bounced”
Bounced addresses, for example, collected via delivery error emails returned to your mailbox, can be processed with the Import/Export add-on.
Inactive subscribers
Newsletter keeps track of subscriber interaction storing a timestamp of the last subscriber’s action. This date and time are then used to compute the inactive subscribers when no actions are seen for a period of time (3 months, 6 months, and so on).
On the subscriber maintenance panel, you can select to add all inactive subscribers, choose the time window, on a list you created, and then take some actions:
- try to reach them out with a special newsletter to get them back
- completely delete those subscribers from your database
There is no uniform approach to “inactive” subscribers, it mostly depends on your kind of business. Sometimes contacting subscribers once a year is ok, but sometimes newsletters are sent daily.
FAQs
What is a “complained” subscriber? A subscriber with the status “complained” means it reported your emails as spam or unsolicited. The report is collected by the delivery service you’re using (Amazon SES, Sendgrid, …). The service, in turn, reports it to the Newsletter plugin (via the delivery service integration addon). A “complained” subscriber is not contacted anymore by the Newsletter plugin. By default, the plugin cannot detect complaints without a delivery service, since they’re not directly reported by the receiving end-point.
How can I import a list of subscribers? To import subscribers you need to install the Import/Export add-on (free) and you can then upload a CSV file or copy and paste your data. The addon provides a mapping tool to map your data to the subscriber’s fields (first name, last name, and so on).
How can I set “bounced” a list of addresses? If you have a set of email addresses that need to be set as “bounced”, you can use the Import/Export add-on (free) and use the bounce import feature. You only need to copy and paste a list of addresses, one per line.