Automated is an addon for the Newsletter plugin which generates and sends automatically newsletters, created using fresh content from your blog. It is not limited to new posts, it can use custom post type, product, event, and so on.
Automated creation of newsletters can be planned hourly, daily, weekly, or monthly in a great variety of ways. Blog contents can be filtered by category, and post type, and an infinite number of channels can be created letting subscribers choose from your great information stream offer.
It is compatible with WPML and Polylang and able to extract content in a specific language.
What's inside
- Setting up a channel
- Targeting
- How it works: dynamic blocks
- Dynamic blocks and the subject
- Planning and sending hours
- Sending hours and DST (Daylight Saving Time)
- Preview for newsletters designed with the composer
- Last delivery date
- Generated newsletters and statistics
- Subscription to channels
- Promoting a single channel
- Promoting your brand new channel to old subscribers
- Newsletter design ideas
- Two posts blocks
- Mix different types of blocks
- Old format channels (deprecated)
- Posts to extract
- Generating the newsletter even without new posts
- Themes and previews for old format channels
- Advanced topics
- Importing old Feed by Mail subscribers
- General configuration and administrator user
- Common issues
- Wrong delivery hour (DST problems)
- Newsletter generation has been skipped
- Automated creates two newsletters and not just one
Automated supports the newsletter design with our composer so you can stack different kinds of blocks.
Blocks which are by nature “dynamic” because they extract the content from the blog, are “regenerated” every time a newsletter is automatically created. And you have fine control over conditions that may need to block the newsletter delivery (for example where there aren’t new content. See more later on this page.
Setting up a channel
A channel is a set of easy configurations comprising:
- the newsletter generation scheduling (hourly, daily, weekly – on specific days, monthly – on specific days)
- the delivery time (hour of the day, once or twice a day)
- the newsletter design with dynamic blocks grabbing content from the blog
- the dynamic subject
Targeting
By default your channel targets every subscriber. You can configure it differently to target a specific list and language.
How it works: dynamic blocks
When a newsletter is generated, all template blocks are refreshed. Some ones just remain unchanged since they’re static, while others (Posts, Events, …) are rendered with the new content available from the blog.
A dynamic block tries to pull out fresh content from the blog and it can be configured to behave in different ways:
- stop the newsletter generation if there are no new contents from the last newsletter sent
- skip the block from the current newsletter if there is no new content
- just write a simple text if there is nothing to show
- render the latest content from the blog regardless of whether it’s new or not
When a block is configured to stop the newsletter generation other blocks’ behavior becomes irrelevant and the newsletter is “skipped”.
The concept of “new content” and what to include in a newsletter can be configured. For example, you can decide to send the newsletter when there is new content but include even the old ones sent with a previous newsletter. Or just send the new ones.
This great flexibility can sometimes produce unclear behaviors: be sure to check all the dynamic blocks included to understand all possible scenarios.
Dynamic blocks and the subject
When it’s the right time to create a new newsletter, the automated engine reruns your design and checks if at least one of the dynamic blocks you inserted has new content. If not, the newsletter is not generated.
Each dynamic block can suggest a subject for the newly generated newsletter. Since there could be more than one block, the subject generated by the first one is kept. If the general subject configuration is left empty, the first block suggested subject is used. Otherwise, the general subject is considered and you can use the {dynamic_subject} new tag to reference the suggested subject.
In this way, you can create more sophisticated subjects like: {date} updates: {dynamic_subject}.
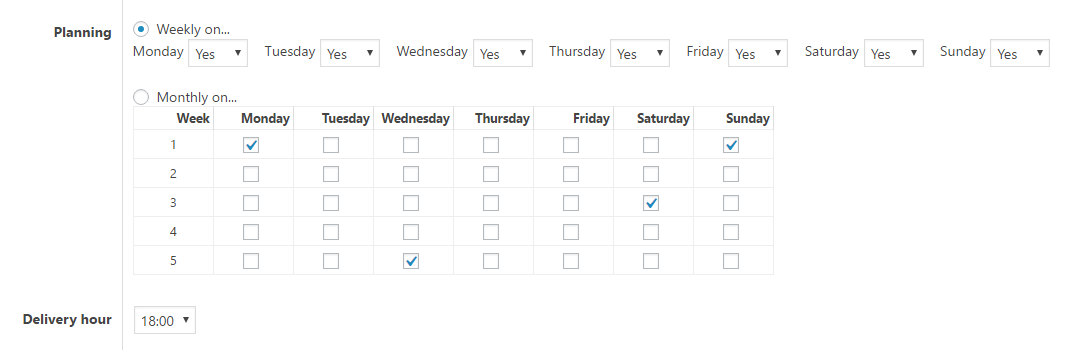
Planning and sending hours
Planning is hourly, daily, weekly, or monthly.
An hourly schedule means the channel checks for new content every hour. It is handy for a site that needs to send out updates as soon as there is something new. To avoid too many overlapped newsletter generation, the channel checks if there is an already sending newsletter and skips to the next-hour check even if there is new content available.
The daily schedule is configured with a weekly schedule (see below) activating all the days.
On weekly schedules, the days of the week can be selected. You can set up a single Monday issue or double week issues, for example on Monday and Thursday. You can eventually offer a channel with a weekly summary and another one with a daily summary.
Monthly scheduling is based on days of the week: first Monday, second Monday, and so on. There is a reason: sending an email on the first day of a month means sending it one time on Monday, another time on Sunday, and another one on Thursday. This is not usually a good idea.
Sending hours and DST (Daylight Saving Time)
A channel can be set to send the generated newsletter at a specific time (of course only on planned days). Usually, you want to set it when your audience is more likely available to read the newsletter. Anyway, keep in mind that with a large database, it could take hours to send to everyone.
A second optional time of day can be set to have a channel generating and sending two newsletters in a day. It is sometimes used by magazines or news sites that want to send two updates, one in the morning and the other one sometime in the afternoon.
Blogs in timezones with DST (Daylight Saving Time) could experience a shift of 1 hour when the official time changes. It’s a known problem, the channel options should be saved to reset the internal timer.
Preview for newsletters designed with the composer
Channels have a preview tab where the newsletter is shown as if it would be sent at that precise time. Of course, if the conditions (settings, new contents, …) meet the criteria of “do not generate a newsletter” the preview will be blank, and a message shown.
Last delivery date
The last delivery date is used to extract fresh posts (and to check if there are fresh posts). This date can be changed on the status panel. Usually, there is no need to modify it but there are a few cases (usually server crashes) where it could be a smart choice to move back that date to regenerate the newsletter. Just a dramatic example.
The status panel shows even the new posts which will be part of the newsletter.
Generated newsletters and statistics
The tab “Newsletters” lists all the generated newsletters for that channel, and their status (sent, sending) and gives action buttons to delete the newsletter or access the statistics.
Subscription to channels
As said, every channel is connected to a list, so you can think of a list as an option for the subscriber who wants to receive updates. Upon regular subscription, you can offer the subscriber one or more lists he can decide to opt-in to, or you can automatically opt-in to one or more lists forcing those lists to the new subscribers (see the subscription configuration panel).
Promoting a single channel
With the new shortcodes, you can even create a specific form for subscriptions to a specific list. So you create a landing page with that form:
[newsletter_form button_label="Go!" lists="1"]
[newsletter_field name="email" label="Your best email"]
[/newsletter_form]
Just remember that an already subscribed email address is correctly managed by the Newsletter plugin: the subscriber experiences a regular subscription but the collected data is merged with the old one.
Promoting your brand new channel to old subscribers
If you set up a brand new channel and you want to promote it to your old subscribers, the best way is to make the associated list available as public (at least on the subscriber’s profile – see the lists panel) and send a newsletter inviting people to activate that option.
Or, to be more aggressive, you can associate every subscriber to your channel list and then send a newsletter to inform them about your new free service (with the option to disable it by modifying the profile). It’s up to you!
Multilanguage
On multilanguage sites (managed by WPML or PolyLang, not Translatepress), you can create one channel per language and set each of them to target the subscriber with the corresponding language.
Then, each channel template should be designed to include a “posts” block configured to extract posts only in the channel language.
Each channel will generate the newsletter with the right content and will send the newsletter to the right people.
A channel cannot generate a newsletter with different content for each language, you need one channel per language.
Newsletter design ideas
Two posts blocks
Imagine a newsletter model with two post blocks: a main block on the top and a secondary block, with posts from a specific category, later in the newsletter body.
You may want to set the main block to stop the newsletter creation if there is no new content to be sure your main elements have something new for your subscribers.
The secondary block can be set to be included anyway, simply extracting what is available in the blog (be it old or new).
Or you can set it to be skipped if there is no new content. You can set it to include only new content or include the number of posts configured only if there is something new. A lot of options, but it’s easy, don’t worry!
Mix different types of blocks
There are different types of dynamic blocks supported. For example, with the WooCommerce Addon you have a block to extract products. With our Tribe Calendar or Events Manager Addon, you can integrate those two famous plugins. Or with the Extended Blocks addon, you can extract generic custom post types.
You can mix those blocks in a single newsletter and set a few of them as “mandatory” (the must-have content for the newsletter to be generated and sent) and other complementary, to be included anyway, or skipped if there are no new contents.
We recommend having at least one main block that controls the newsletter generation and delivery.
Old format channels (deprecated)
Channels based on the previous classic or custom theme are still there and will be kept.
Posts to extract
Posts can be extracted without filters or by selecting one or more categories. Custom post types are supported but sometimes theme customization is needed to extract from them all the custom fields.
There is no correspondence between your blog categories and Automated channels. Since readers don’t care too much about your internal category organization, is up to you to create channels with one or more categories that can be of interest to your subscribers.
Read, for example, how to organize the channels for a Magazine blog.
Posts are extracted by applying those filters and starting from the date of the last newsletter, so the posts that are added are always unread posts (anyway a theme can add a list of “old posts” in the lower part of the newsletter).
Generating the newsletter even without new posts
In some special situations, usually with a custom theme, you may need to have Automated to generate the newsletter even if there are no new posts. Enabling that special feature, Automated invokes the theme passing it an empty list of posts.
The custom theme can extract/generate the content in a different way than using the latest blog post (for example extracting special post types or the like). If the theme detects there is nothing to send it can exit before generating any content and Automated will detect it stops.
In the plugin subfolder “themes/samples" there is a theme named “always” which can be used with the option this special option active. Copy the theme in the “wp-content/extensions/newsletter-automated/themes" folder (create it if necessary) to start using and customizing it.
Themes and previews for old format channels
In the theme panel, a theme can be chosen, and once saved, its options panel is loaded. The theme can show the extracted posts, offering a few options to control the layout or other kinds of content (header, footer, and so on).
Two previews are available:
- the theme preview is built by extracting a few posts and composing a generic newsletter: it helps to get an overview of how the theme looks.
- the newsletter preview is the real newsletter that would be sent if generated at that moment. This preview can be empty if there is nothing to send to subscribers (no new content from the last delivery).
You can make your own custom themes, they must be placed in the “wp-content/extensions/newsletter-automated/themes" folder (create it if necessary). Read more about themes.
Advanced topics
Importing old Feed by Mail subscribers
If you’re using Feed by Mail Newsletter Addon and you’re planning to migrate to Automated (highly recommended), you can “import” the Feed by Mail subscribers into the list you selected for a channel. There is an import button on the channel configuration panel.
Here are the steps:
- prepare the Automated channel and set the list you’re targeting (the list can be empty or have already subscribers inside)
- save the channel
- use the “import” button to assign the active Feed by Mail subscriber to the channel list
Subscribers who opted out from Feed by Mail, won’t be added to the channel list.
Of course, if you are targeting all subscribers with your automated channel, you don’t need to import them from Feed by Mail.
Tech note
The subscriber table wp_newsletter has a special column to track the feed by mail subscription. If you need to act at the database level, the feed columns can assume three values:
- 0 – means the subscriber is NOT connect to Feed by Mail
- 1 – means the subscriber is connected to Feed by Mail
- 2 – means the subscriber explicitly opted-out from Feed by Mail
General configuration and administrator user
Automated newsletters are generated when no one is logged in, in a background process. In some cases, Automated cannot extract the latest posts for example when all of them are private or blocked by a membership plugin.
Setting the administrator users on Automated general configuration allows Automated to “simulate” an administrator logged in when generating the newsletter. That could (not granted by the way) let Automated access private or locked posts.
Common issues
Wrong delivery hour (DST problems)
If in your country there is a seasonal hour change (DST), Automated can get wrong since the WordPress scheduler does not automatically correct the delivery time (Automated is still reporting the right hour on configuration pages). We’re trying to find a solution, meanwhile, you need to re-save each channel so the internal WP scheduler is adjusted.
Newsletter generation has been skipped
Please, see the Automated channel log page for an history of the channel activity.
Usually, the missing newsletter generation is due to a wrong template configuration.
Check the posts block and its filtering conditions to be sure it can find new posts to be sent. The Posts block adds to the filter the timestamp of the last delivery to not include “old” posts (if configured for this behavior): while composing this extra filter is not active so you can see even the old posts.
If you have more than one Posts block, and every block is configured to “stop” the newsletter when there are no new posts, be sure all of them can find something to include or configure just one block to “stop” the newsletter generation.
Automated creates two newsletters and not just one
Check if the channel has been configured with a second delivery time (used to send twice in a day).