The subscription process is divided in three main parts:
- A subscription form: users must insert their email address and eventually set their preferences;
- Activation phase: here you can choose between two options: a) the user can be subscribed instantly (single opt-in) or b), the user must confirm his email address by clicking on an activation link;
- Welcome page and message: you thank the subscriber for his interest and give to the subscriber the chance to modify his preferences and profile. The issue of conversion tracking will be addressed in this section.
As you can see here, the process is very smooth and the configuration quite easy. Let’s go trough each single step.
What's inside
1. Subscription forms
The essential ingredient for a successful newsletter is a great subscription form. As you know, the subscription process starts when a user founds a subscription opt-in on your site. Some locations where you can put a form are landing pages, cart checkouts, sidebar widgets, inside posts, contact forms etc.
Remember that the Newsletter dedicated page also shows a subscription form if it is opened directly (when it is not used to show service messages).
Important notes:
- Read more about subscription forms on the dedicated page, there are also some tips and tricks to maximize your subscription rate.
- Opt-in. When you configure the subscription forms, you have different options. For example, you have to choose for example between single or double opt-in: the first option simply collects emails and gives a welcome message, while double opt-in requires the user to confirm the email address.
- You may also want to insert your subscribers on different lists, which are an essential tool to segment your subscribers and to collect their preferences. You can show one or more lists on the subscription form, but there are also many other options! Check out the page dedicated to the Lists.
- All the text on the subscription forms and all message shown or sent can be personalized and translated. You can find them on the Subscription page, inside the Newsletter dashboard.
- Repeated subscriptions: Sometimes your users re-subscribe to your newsletter because they forgot that they have already subscribed or maybe because they want to get again a free gift you promise on subscription. Sometimes this happens because there are different forms on different pages of your sites, which insert the users in different lists. On Newsletter you can choose if you want to allow repeated subscriptions. therefore, there are two cases:
a. Multiple subscriptions are not accepted: an error message is shown (the status of the subscriber does not matter). You can also set different behaviors depending on the opt-in mode you selected and other factors
b. Multiple subscription are accepted: In this case the subscription process works as it works for a normal subscription. When the process is complete, Newsletter merges the new data with the old one.
We created a tutorial to explain the whole subscription process, have a look!
2. Activation phase
This section is relevant just if you have chosen the double opt-in. In this case, you should configure the email and messages to be sent to your subscriber to activate his subscription.
The activation message is shown to the user after the subscription and it should contain a notice about the activation email he should find in his mailbox. Remind your users to check the spam folder when looking for that email.
If you change the activation email, remember that it MUST contain the activation link. This link is generated by Newsletter and inserted where the special tag {subscription_confirm_url} is found. Therefore, make sure you don’t change or erase this tag!
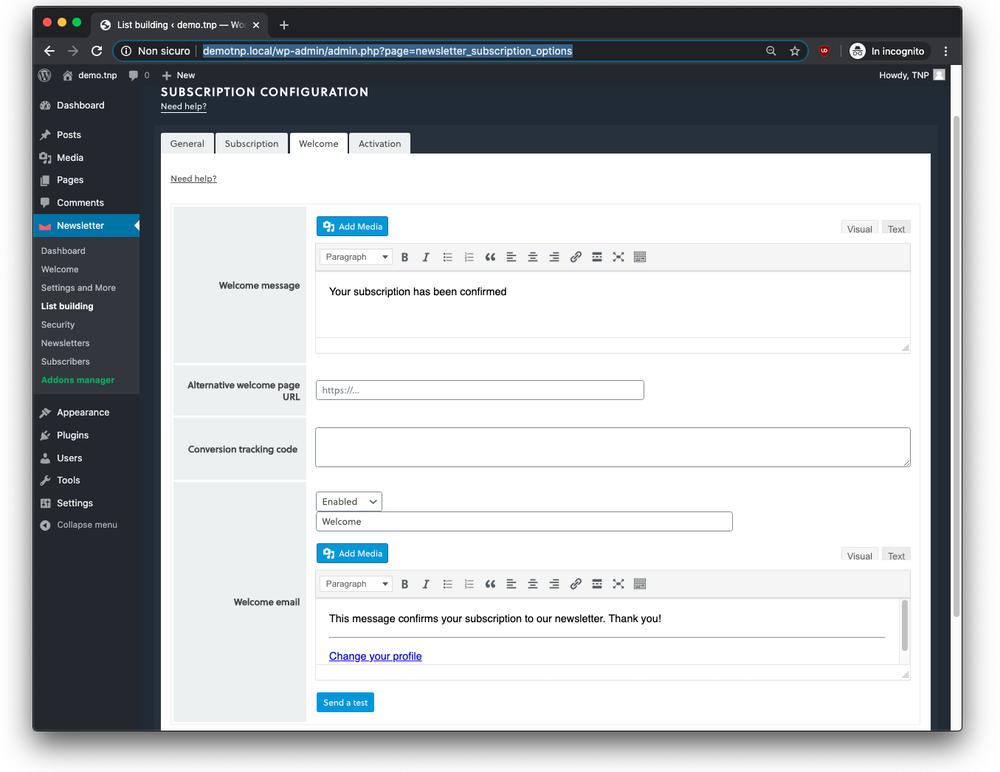
3. Welcome page and messages
When the user activates his subscription (whether through the single opt-in or the activation email) he lands on a welcome page and receives a welcome message via email.
You can personalize both, or, if you like, you can disable the welcome email. You can also set a personalized page as the welcome page if you want, by inserting the URL of the custom page on the welcome page settings.
If you promoted the subscription to the newsletter with a give-back (for example a discount code or a link to a free content), this must be included on the welcome page and welcome message.
Advanced configurations
- Single and double opt-in. With the single opt-in, the gift should be inserted only on the welcome email, to force the subscriber to insert a real address. If you selected the double opt-in, this is not a problem, as you are sure that you have a real and owned email address in your database.
The opt-in mode can be overwritten specifying a different mode on forms, but you need to enable that feature on subscription configuration. - Conversion tracking. If you are running campaigns to get subscribers, you could have a conversion tracking code that must be added to the so-called “thank you page”. With Newsletter, this page is the welcome page. The code, usually an image or a snippet of javascript can be added by Newsletter on the welcome page.
You just have to paste the code in the “conversion tracking code” field. Be aware that, if you specified an alternative welcome page URL, your tracking code must be added to that custom page. Newsletter can not perform this task on your behalf. - Profile edit page and link. We recommend adding to the welcome email the profile edit link. By clicking on this link the subscriber can manage his preferences and update his personal information. To insert this link, just use the special tag
{profile_url}. This is particularly important if you have a complex subscriber’s profile and you want your user to insert optional information or to select among different newsletter preferences. Read more about profile pages. - Cancellation. When we talk about cancellation, we refer to the process to unsubscribe. Read more about cancellation and about the options available.
- Message templates. Last but not least, Newsletter allows users to edit the template of the “service messages” (activation, welcome, and goodbye emails). Please bear in mind that the old email.php and email-alternative.php are not supported anymore. Read more about message templates.